

CREATING REALISTIC LOOKING PAVED PATHS ON YOUR LAYOUT
- Scott Vargo
- Mar 26, 2024
- 3 min read
Updated: Mar 27, 2024
I've had a lot of people ask me how I created the small, paved roads and walking paths on my slot car layout. Here is my method that seems to work pretty well:

Sometimes it's the simple materials that work the best. In this case it was good old poster board for me. You can find a good selection of colored poster board at all the big craft stores, like Hobby Lobby and Michael's. Poster board is perfect for making paved paths as it will bend to conform to uneven surfaces, and you can crease it to make realistic appearing cracks like real asphalt roads. It's also easy to paint and can be sanded and torn to add weathering.

Look for a good shade of grey that suites your layout. For my purposes I found the grey backside of a black poster board worked well. Whatever shade you choose, make sure the poster is a solid dark grey or black base color all the way through and not white, or white will show through on edges or torn areas.
First choose and prep your area where you want the paved path. Make sure the area is fairly flat and will have good "earth" around both sides of it. It's a good idea to have your base earth color paint base finished before gluing a path down.
Next, draw out your path shape onto the poster board and cut the shape with heavy scissors or hobby knife as shown below. Shape the edges to fit the path area. Remember, it's OK to have uneven edges in places. If you need to add multiple pieces of poster to make your path, be sure and leave some extra material at the ends to overlap. (we'll show how to match the seams next)


Once you have your pieces shaped the way you want them it's time to join them. Here is a clever tip to make the seams nearly invisible:
Cut a random crooked edge on one piece of poster board
Next, trace that edge to the next adjoining piece of poster board
Trim the sides so they match up
Now you have a hidden seam that looks like a crack


Now that you have the shapes for the path cut and seamed it's time for texturing and weathering. Google Images is a great resource for finding photos of worn, cracked walking paths as resource material.

Asphalt pavement starts out black when new but doesn't stay black for long. Over time it fades and wears down to a grey color, with wear and cracks.

This can all be added to your scale layout with a few simple tricks:
The first thing you want to do is rough up the edges of the poster board path. Use a knife, rough file or rasp to scuff and scrape the edges and create an uneven surface. If you get a small tear, it's OK, as this will give the look of broken or patched edges along the path. Next you can lightly sand the poster board for more texture. Go easy depending on what grit paper you use. You can get creative in making your path looking new or one that has seen some years of use- it's all up to you!

The next step will be applying light 'spatters' of white, light grey and flat black spray paint. go lightly here until you get a feel for coverage. Remember, you want to have mostly base color showing with just a little overspray for texturing.

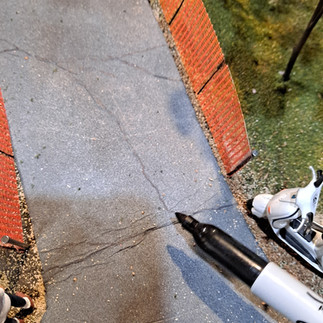
And now for the final touches: The cracks! I found poster board is super easy to make realistic looking pavement cracks. If you are adding a paved path to an uneven area you will need to bend the poster board to conform to the surface. Even if you're laying it flat, you can still add cracks for added realism. To make realistic looking cracks, gently fold the poster board in places in both directions. this will leave creases in the surface that look real. Experiment with different bends to create different crack shapes. The final touch is going over the raised wrinkles with a clean Sharpie black pen. Use a light touch here!


Now your paved path is ready to glue to your layout. Use a strong bonding glue to help the poster board stay conformed to the surface. Use weight to hold it down during drying.
Once you have everything glued in place you can add more landscaping materials to the edges. I used some fine gravel to look like the limestone base that has pushed out, along with little stick-on hedges you can buy.


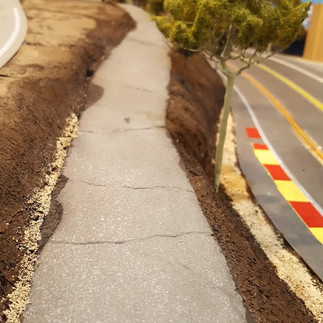


That about does it. Hope you found these tips useful to help build your own realistic looking paved paths on your track layout. Good luck!


Comments